Push通知の実装をした後、すぐにExpo SDK38でexpo-notificationsが書き換わって、もろもろ書き換えてたら結構実装に時間がかかった
https://blog.expo.io/expo-sdk-38-is-now-available-ab6cd30ca2ee
対応PR
backend
- Expo Pushのtokenを保存 by wheatandcat · Pull Request #8 · wheatandcat/PeperomiaBackend · GitHub
- テスト用のPush通知APIを実装 by wheatandcat · Pull Request #11 · wheatandcat/PeperomiaBackend · GitHub
- cron.yamlで当日のスケジュールをPush通知を送信する by wheatandcat · Pull Request #15 · wheatandcat/PeperomiaBackend · GitHub
- ユーザーにロールを追加 by wheatandcat · Pull Request #17 · wheatandcat/PeperomiaBackend · GitHub
web
アプリ
- Expo Pushトークンの保存 by wheatandcat · Pull Request #614 · wheatandcat/Peperomia · GitHub
- Push通知実装 by wheatandcat · Pull Request #653 · wheatandcat/Peperomia · GitHub
- Expo SDK 38にバージョンアップ by wheatandcat · Pull Request #654 · wheatandcat/Peperomia · GitHub
ExpoでのPush通知実装
ExpoでPush通知を使用する場合は、expo-notificationsを使用します。
Push Notifications - Expo Documentation
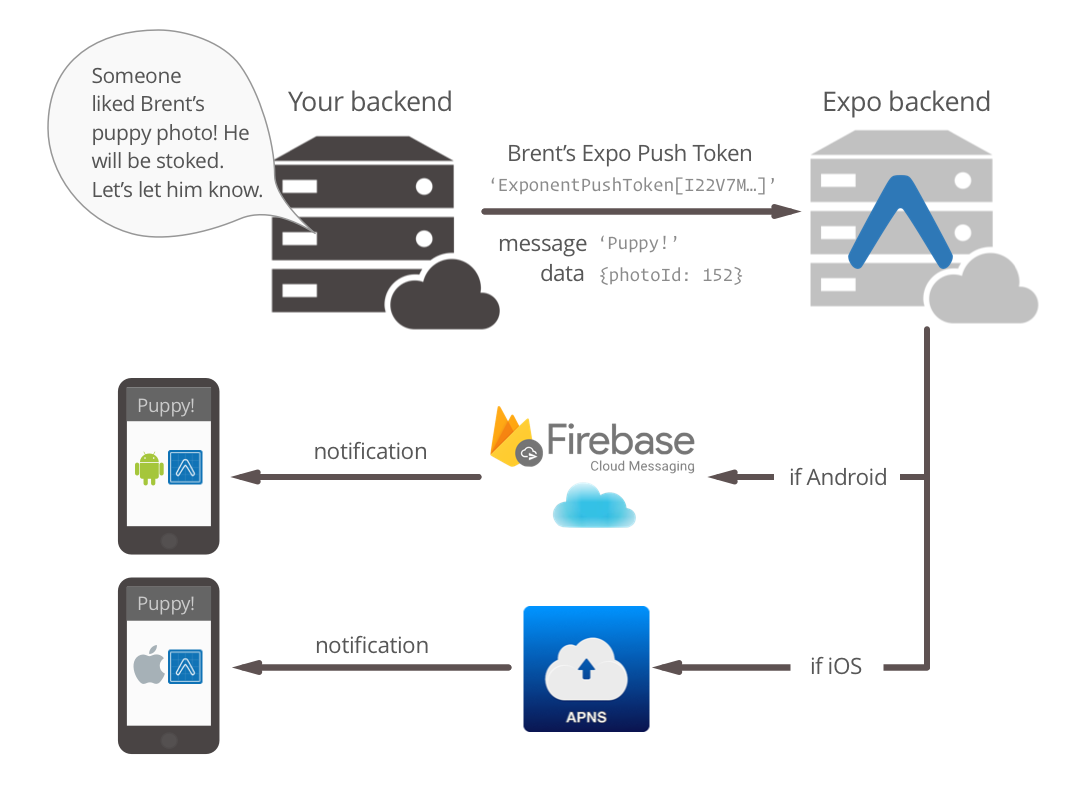
Push通知処理は画像の通りで大部分はExpo内に内包されているので、簡単に実装できます。
expoのpush notificationのsdkが各言語でサポートされているので、今回はGo言語を使用して実装しました。
GitHub - oliveroneill/exponent-server-sdk-golang: Exponent push notification go library
実装の流れ
アプリでExpo Push Tokenを取得
    if (!Constants.isDevice) {
      Alert.alert('端末から実行してくだださい');
      return false;
    }

    const { status: existingStatus } = await Permissions.getAsync(
      Permissions.NOTIFICATIONS
    );

    let finalStatus = existingStatus;
    if (existingStatus !== Permissions.PermissionStatus.GRANTED) {
      const { status } = await Permissions.askAsync(Permissions.NOTIFICATIONS);
      finalStatus = status;
    }

    if (finalStatus !== 'granted') {
      Alert.alert('Push通知のトークンの取得に失敗しました');
      return false;
    }

    const { data: token } = await Notifications.getExpoPushTokenAsync();

    if (Platform.OS === 'android') {
      Notifications.setNotificationChannelAsync('default', {
        name: 'default',
        importance: Notifications.AndroidImportance.MAX,
        vibrationPattern: [0, 250, 250, 250],
        lightColor: '#FF231F7C',
      });
    }
Notifications.getExpoPushTokenAsync() でPush通知に必要なトークンを取得できます。
backendでExpo Push Tokenを保存して、Push通知を実装
上記で取得したExpoPushTokenを保存して
https://github.com/wheatandcat/PeperomiaBackend/pull/8
テスト用のPush通知APIを実装
https://github.com/wheatandcat/PeperomiaBackend/pull/11
https://app.swaggerhub.com/apis-docs/wheatandcat/peperomia/1.0.0#/

webにテスト用のPush通知を送るデバック機能を実装
ユーザーにadminの権限を制御追加してPush通知を送るデバック機能を実装
https://github.com/wheatandcat/PeperomiaWeb/pull/36/files


アプリでPush通知から画面遷移する機能を実装
アプリでPush通知から画面遷移する機能を実装
https://github.com/wheatandcat/Peperomia/pull/653
さらに、Expo SDK 38で書き方が変わったので対応
https://github.com/wheatandcat/Peperomia/pull/654
以下、Push通知のリスナーを追加して、ハンドラーの先で画面遷移の処理を追加して実装
  React.useEffect(() => {
    const subscription1 = Notifications.addNotificationReceivedListener(
      handleNotificationReceived
    );
    const subscription2 = Notifications.addNotificationResponseReceivedListener(
      handleNotificationResponseReceived
    );

    return () => {
      subscription1.remove();
      subscription2.remove();
    };
  }, [handleNotificationReceived, handleNotificationResponseReceived]);
こんな感じで動きます


backendでカレンダー情報をもとにPush通知を送る
当日のスケジュールをPush通知を送信する
https://github.com/wheatandcat/PeperomiaBackend/pull/15

このAPIをcron.yamlに設定して定期的に実行しています
ガチでやるならPush通知の処理はのCloud Tasksに送ると良さそうです(これは後で試してみます)
ここまでやって、やっとやりたいことが実装できました 。実装量多くて時間がかかった
