APIのE2Eテストを実装したいなーと思い調べていたところ、以下の記事を見つけてscenarigoが、良さげだなと思ったので実装してみた。
PR
実装
scenarigo実行まで
scenarigoはGO製のscenario-based API testingのツール。シンプルな作りで使いやすいツールだったので採用した。
基本的にな使い方はREADMEを参照して貰うとして、memoirで実装した部分について記載していく。
scenarigoではyamlを作成し、その情報を元にE2Eテストを行う。
以下のyamlファイルを作成
schemaVersion: config/v1

scenarios:
- user.yaml
次に実行するE2Eテストを記載する。まずはユーザーの作成を実行する
title: ユーザー
steps:
- title: login
  include: './login.yaml'
  bind:
    vars:
      userToken: "{{vars.userToken}}"
- title: ユーザーを作成する
  protocol: http
  request:
    method: POST
    url: "http://{{env.HOST}}/query"
    header:
      Authorization: "Bearer {{vars.userToken}}"
      Content-Type: application/json
    body:
      query: |-
        mutation CreateAuthUser($input: NewAuthUser!) {
          createAuthUser(input: $input) {
            id
          }
        }
      variables:
        input:
          id: test_id
          isNewUser: true
  expect:
    body:
      data:
        createAuthUser:
          id: test_id
scenarigoではincludeを使用することで別のyamlファイルから設定を取得できる。
- title: login
  include: './login.yaml'
  bind:
    vars:
      userToken: "{{vars.userToken}}"
各APIを実行するためにFirebaseのAuthトークンが必要なので、E2Eテストの実行前にAuthトークンを設定したlogin.yamlを生成する以下のスクリプトを生成して、includeするように修正。
package main

import (
    "bytes"
    "context"
    "encoding/json"
    "fmt"
    "io/ioutil"
    "log"
    "net/http"
    "os"

    firebase "firebase.google.com/go"
    "github.com/joho/godotenv"
    "google.golang.org/api/option"
    "gopkg.in/yaml.v2"
)

const verifyCustomTokenURL = "https://www.googleapis.com/identitytoolkit/v3/relyingparty/verifyCustomToken?key=%s"

type User struct {
    UserToken string `yaml:"userToken"`
}

type LoginYaml struct {
    Vars User
}

func main() {
    err := godotenv.Load(".env")
    if err != nil {
        log.Fatalf("読み込み出来ませんでした: %v", err)
    }

    ctx := context.Background()
    opt := option.WithCredentialsFile("../serviceAccount.json")
    config := &firebase.Config{ProjectID: os.Getenv("FIREBASE_PROJECT_ID")}
    app, err := firebase.NewApp(ctx, config, opt)
    if err != nil {
        log.Fatalf("error initializing app: %v\n", err)
    }

    client, err := app.Auth(ctx)
    if err != nil {
        log.Fatalf("error getting Auth client: %v\n", err)
    }

    token, err := client.CustomToken(ctx, "some-uid")
    if err != nil {
        log.Fatalf("error minting custom token: %v\n", err)
    }

    req, err := json.Marshal(map[string]interface{}{
        "token":             token,
        "returnSecureToken": true,
    })
    if err != nil {
        log.Fatalf("error minting custom token: %v\n", err)
    }

    apiKey := os.Getenv("FIREBASE_API_KEY")

    resp, err := postRequest(fmt.Sprintf(verifyCustomTokenURL, apiKey), req)
    if err != nil {
        log.Fatalf("error minting custom token: %v\n", err)
    }

    var respBody struct {
        IDToken string `json:"idToken"`
    }
    if err := json.Unmarshal(resp, &respBody); err != nil {
        log.Fatalf("error minting custom token: %v\n", err)
    }

    ly := LoginYaml{}
    ly.Vars.UserToken = respBody.IDToken

    if err := WriteOnFile("./login.yaml", ly); err != nil {
        log.Fatalf("WriteOnFile: %v\n", err)
    }

    os.Chmod("./login.yaml", 0777)
}

func postRequest(url string, req []byte) ([]byte, error) {
    resp, err := http.Post(url, "application/json", bytes.NewBuffer(req))
    if err != nil {
        return nil, err
    }

    defer resp.Body.Close()
    if resp.StatusCode != http.StatusOK {
        return nil, fmt.Errorf("unexpected http status code: %d", resp.StatusCode)
    }
    return ioutil.ReadAll(resp.Body)
}

func WriteOnFile(fileName string, data interface{}) error {
    // ここでデータを []byte に変換しています。
    buf, err := yaml.Marshal(data)
    if err != nil {
        return err
    }
    // []byte をファイルに上書きしています。
    err = ioutil.WriteFile(fileName, buf, os.ModeExclusive)
    if err != nil {
        return err
    }
    return nil
}
生成されるlogin.yamlのファイルは以下の通り
■ e2e/login.yaml
vars:
  userToken: *******************************
上記のファイルを変数化することで以下のAPI実行部分で使用できる
- title: ユーザーを作成する
  protocol: http
  request:
    method: POST
    url: "http://{{env.HOST}}/query"
    header:
      Authorization: "Bearer {{vars.userToken}}" // ← ここで使用
これでAPI実行が行える状態になった。
但し、このまま実行すると実行毎にscenarigoを実行毎にユーザーデータがfirestoreに作成されてしまう。
今回はローカルで起動して、E2Eテストを行う想定なので、ローカルでFirestoreのエミュレータを起動して接続する方式で実装。
まず、firestoreのエミュレータを起動のための設定ファイルを作成
{
  "emulators": {
    "firestore": {
      "port": 3600
    },
    "ui": {
      "enabled": true,
      "port": 3601
    }
  }
}
以下のコマンドでエミュレータを起動
$ npx firebase --config e2e/simulator/firebase.json emulators:start

┌───────────┬────────────────┬─────────────────────────────────┐
│ Emulator  │ Host:Port      │ View in Emulator UI             │
├───────────┼────────────────┼─────────────────────────────────┤
│ Firestore │ localhost:3600 │ http://localhost:3601/firestore │
└───────────┴────────────────┴─────────────────────────────────┘
  Emulator Hub running at localhost:4400
  Other reserved ports: 4500
port=3600でfirestoreが起動、3601で確認用のUIブラウザが起動
http://localhost:3601/firestoreにアクセスする以下のように表示される

次は、以下のコマンドでローカルサーバー起動時のfirestoreの接続先をエミュレータに変更して起動
※ FIRESTORE_EMULATOR_HOSTを指定すると自動でエミュレータに接続するようになる
$ FIRESTORE_EMULATOR_HOST=localhost:3600 air
この状態で以下のコマンドを実行
$ cd e2e
$ cd go run script/main.go  // ← login.yamlを作成
$ HOST=localhost:8080 scenarigo run
ok      user.yaml   0.278s
テストが成功したので、実際にfirestoreのデータを確認すると以下の通り正しくデータが作成されている
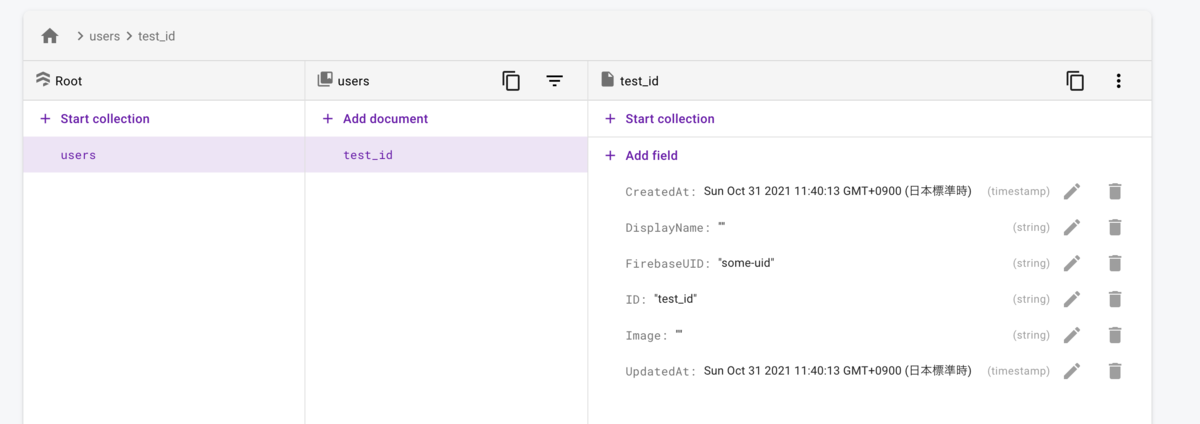
これで正常に動作しているのが確認できた。上記ではデータ確認のためfirestoreのUIを起動したが、実際に手元でテストを実行する場合は以下のコマンドを使用すると実行時にエミュレータが起動して、終了後に停止するので便利
$ px firebase --config e2e/simulator/firebase.json emulators:exec 'HOST=localhost:8080 scenarigo run'
実際には、この後ユーザーの取得や更新といったテストを追加するが、この記事では、そこは省略してアイテムの作成→取得の実装を紹介
scenarigoでアイテム作成→取得までの実装
まず、scenarigoのconfigファイルにitem.yamlを追加
schemaVersion: config/v1

scenarios:
- user.yaml
- item.yaml
item.yamlは以下の通りに作成
title: アイテム
steps:
- title: login
  include: './login.yaml'
  bind:
    vars:
      userToken: "{{vars.userToken}}"
- title: アイテムを作成する①
  bind:
    vars:
      itemID: "{{response.data.createItem.id}}"
  protocol: http
  request:
    method: POST
    url: "http://{{env.HOST}}/query"
    header:
      Authorization: "Bearer {{vars.userToken}}"
      Content-Type: application/json
    body:
      query: |-
        mutation CreateItem($input: NewItem!) {
          createItem(input: $input) {
            id
            title
            date
            categoryID
            like
            dislike
            createdAt
            updatedAt
          }
        }
      variables:
        input:
          title: 散歩に行った
          categoryID: 1
          date: 2021-01-01T00:00:00+09:00
          like: true
          dislike: false

- title: アイテムを取得する
  protocol: http
  request:
    method: POST
    url: "http://{{env.HOST}}/query"
    header:
      Authorization: "Bearer {{vars.userToken}}"
      Content-Type: application/json
    body:
      query: |-
        query Item($id: ID!) {
          item(id: $id) {
            id
            title
            categoryID
            date
            like
            dislike
          }
        }
      variables:
        id: "{{vars.itemID}}"
  expect:
    body:
      data:
        item:
          id: "{{vars.itemID}}"
          title: 散歩に行った
          categoryID: 1
          date: 2021-01-01T00:00:00+09:00
          like: true
          dislike: false
アイテムを作成する①のResponseで返ってくるidの値を使用して、アイテムを取得するのRequest パラメータに設定する必要がある。
実装方法は以下のbind.varsにResponseで取得できる値をitemIDとして設定
  bind:
    vars:
      itemID: "{{response.data.createItem.id}}"
上記の値を以下のように使用することで、Responseで返ってくる値をRequest パラメータに設定することができる。
      variables:
        id: "{{vars.itemID}}"
上記を実装してscenarigoを実行すると以下の通りテストは成功し、
$ HOST=localhost:8080 scenarigo run
ok      user.yaml   0.278s
ok      item.yaml   0.100s
アイテムのデータも正しく設定できるのを確認できた。

GitHub Actionsでscenarigoを実行する
最後にGitHub Actionsでのscenarigoの実行方法を紹介。
実装したGitHub Actionsは以下の通り
■ .github/workflows/scenarigo.yml
name: e2e test
on: [push]
env:
  FIREBASE_TOKEN: ${{ secrets.FIREBASE_TOKEN }}
  SERVICE_ACCOUNT_JSON: ${{ secrets.REVIEW_SERVICE_ACCOUNT_JSON }}
  GCP_SERVICE_ACCOUNT_JSON: ${{ secrets.REVIEW_GCP_SERVICE_ACCOUNT_JSON }}
  APP_LOCAL_EMV: ${{ secrets.APP_LOCAL_EMV }}
  ENVENB_GO: ${{ secrets.ENVENB_GO }}
  AUTH_CONFIG: ${{ secrets.AUTH_CONFIG }}
jobs:
  e2e:
    name: test
    runs-on: ubuntu-latest
    steps:
    - name: Checkout repository
      uses: actions/checkout@v2
    - name: Create serviceAccount.json file
      run: echo $SERVICE_ACCOUNT_JSON | base64 --decode -i > ./serviceAccount.json
    - name: Create gcpServiceAccount.json file
      run: echo $GCP_SERVICE_ACCOUNT_JSON | base64 --decode -i > ./gcpServiceAccount.json
    - name: Create .env file
      run: echo $APP_LOCAL_EMV | base64 --decode -i > ./.env
    - name: Create envenb.go file
      run: echo $ENVENB_GO | base64 --decode -i > ./envenb.go
    - name: Create e2e/.env file
      run: echo $AUTH_CONFIG | base64 --decode -i > ./e2e/.env
    - uses: actions/setup-go@v2
      with:
        go-version: '^1.16'
    - run: go version
    - name: cache
      uses: actions/cache@v2
      with:
        path: ~/go/pkg/mod
        key: ${{ runner.os }}-memoir-backend-${{ hashFiles('**/go.sum') }}
        restore-keys: |
          ${{ runner.os }}-memoir-backend-
    - name: Run server
      run: make ci_setup_server
    - name: create auth token file
      run: make create_login_yaml
      working-directory: ./e2e
    - name: setup gcloud
      uses: google-github-actions/setup-gcloud@master
      with:
        version: "latest"
    - name: setup firestore emulator
      run: |
        gcloud components install beta --quiet
        gcloud components install cloud-firestore-emulator --quiet
    - name: setup e2e
      run: |
        gcloud beta emulators firestore start --host-port localhost:3600 &
        go install github.com/zoncoen/scenarigo/cmd/scenarigo@v0.8.1
      working-directory: ./e2e
    - name: run e2e
      run: make scenarigo
      working-directory: ./e2e
firestoreのエミュレータはgcloudコマンドからも起動可能なので、以下のコマンドで起動
    - name: setup gcloud
      uses: google-github-actions/setup-gcloud@master
      with:
        version: "latest"
    - name: setup firestore emulator
      run: |
        gcloud components install beta --quiet
        gcloud components install cloud-firestore-emulator --quiet
    - name: setup e2e
      run: |
        gcloud beta emulators firestore start --host-port localhost:3600 &
以下のコマンドでローカルサーバーを起動
$ FIRESTORE_EMULATOR_HOST=localhost:3600 go run app.go &
最後にscenarigoを実行
    - name: setup e2e
      run: |
        gcloud beta emulators firestore start --host-port localhost:3600 &
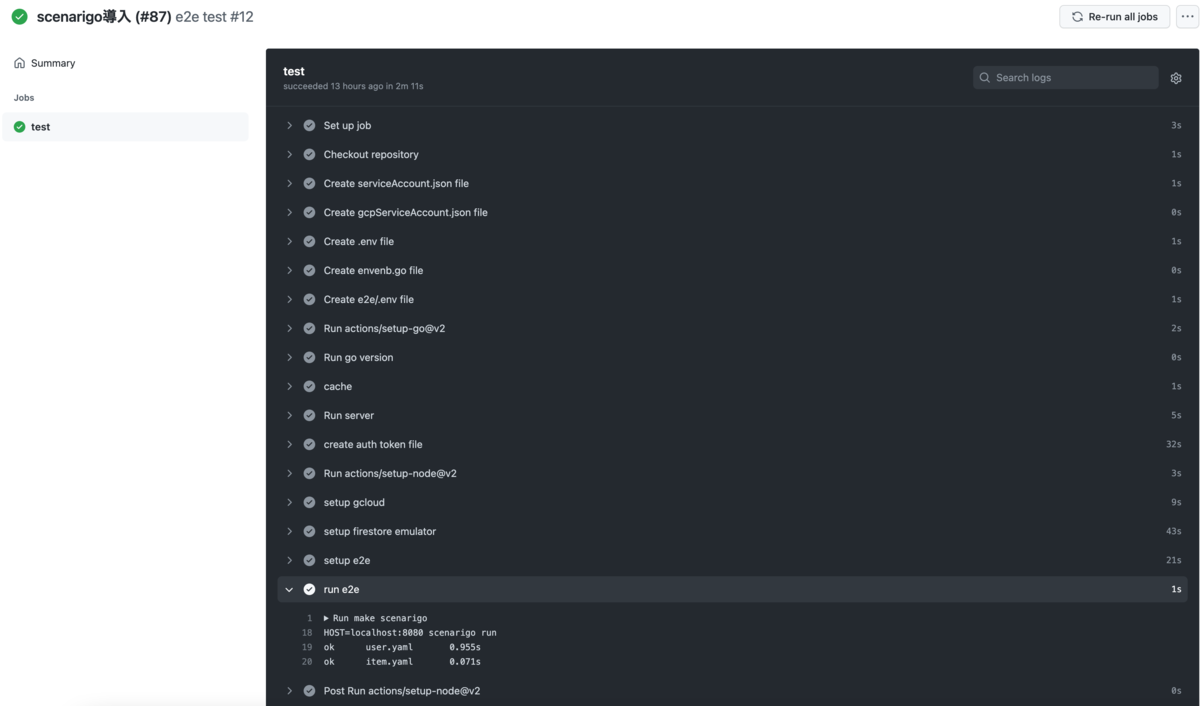
上記でGitHub Actionsでもscenarigoが実行できた
https://github.com/wheatandcat/memoir-backend/runs/4055476705?check_suite_focus=true
まとめ
- シンプルで使いやすいツールだった。
- シナリオテストはシステムの保守の簡易化につながるので積極的に追加していきたい